


A simple soft serve ice cream drawing as a catalyst for student behavior- it sounds so simple. I’m here to tell you that it’s not only simple, it’s possible. Skills build confidence, which leads to investment and buy-in, and this leads to positive behaviors all throughout your middle or high school art classroom.
Today we’re talking about High Contrast Drawing – specifically the Soft Serve Ice Cream Drawing Lesson. This is one of my all time faves, and it’s one of the kids’ faves too. It’s a chance to draw some really cool stuff using just a white colored pencil and black construction paper (can you say CHEAP supply list?)
Developing strong drawing skills has so many payoffs:
It Build skills.
It Build confidence.
It Build an atmosphere of excellence.
It Build an unstoppable art program filled with amazingly confident artists.
Artists who are willing to tackle anything you set before them.
Fox’s Scaffolded Philosophy – Teaching Drawing Skills Sequentially
Over the course of a semester, the scaffolded approach to teaching drawing in my classroom plays out in this order: (this order is very specific)
- Visual Autobiography
- Line Drawing
- Drawing with shapes
- Drawing using Negative Space
- Drawing using Value
- Drawing using Reverse Value (a.k.a. High Contrast Drawing)
- Drawing using Color
And that’s it.
18 weeks of skills and confidence that cements a shared attitude of excellence in the art room.
The High Contrast Drawing Unit usually occurs about 13 weeks into the semester. It is Part Five in my Six-Part Scaffolded Drawing Philosophy – more on this in my Teaching Drawing – A Scaffolded Approach Presentation.
Why Part Five?
At this point in the semester, the kids have strong observational skills (Line Drawing Lesson), they understand how to scale up a reference freehand using shapes (Shape Drawing), they are skilled at evaluating negative space to keep proportions in tact (Negative Space Drawing) and they have mastered Value (No Outline Sphere). (These lessons plus color lessons)
This unit fits nicely in the teaching sequence following Value. The concept of value gradation, edges, hard and soft transitions and value identification is fresh in their minds. In our case this semester, the kids just finished a self-portrait so the confidence is through the roof.
Yesterday they came into class and I said, “Ok, now that we know how to scale up and add value using graphite pencil, let’s tackle value reversal using white colored pencil on black paper with no erasing.” The overall response was “Sure, let’s do it.” No whining. No complaining. No exasperated sighs.
I start with a presentation at the beginning that has some really cool student work using this medium on the black paper. It’s pretty impressive. The kids get a sense of what they can do in the future (Drawing 2 and AP Studio Art) and this fuels their desire to get down to business and hard work.
Side Note: As I said at the beginning of this post, students who are confident are less likely to avoid the assignment, get off task or act out. I can personally attest to this. It’s true.
Here are some of those “teaser” projects I mentioned above:


The Importance of Drawing the Sphere
We begin high contrast with the Sphere Drawing (of course) to get them used to the feel of the pencil and how it interacts with the paper. I explain the “no erasing” philosophy and why erasing waxy colored pencil leaves a nasty slimy mess and we do NOT want that. This works just as effectively as the “no finger smudging” philosophy with graphite pencil. As long as they know the “why” they’re cool with it.
In my humble opinion, the sphere is the single most effective exercise for kids to successfully master any medium. This exercise single-handedly changed my life (see previous blog post “The Value of Good Value”). It’s where they “work the kinks out.” I call this the “casual dating” phase between them and the medium. (I teach high school so they can easily understand this analogy – lol).
Here are a few of the examples of our high contrast spheres from yesterday:


The sphere is where we figure out how to create our smooth transitions, our crisp edges, how to sharpen the pencil (not in the wall sharpener!) using a handheld sharpener, how to build our lighter values slowly by adding layers. This can be tricky for some kids in the beginning, as they are so used to adding darker values by adding layers of graphite pencil. The presentation and student instructional sphere video go over this in detail.
The other added bonus is this lesson introduces them to how colored pencil functions. Remember, color is the last stop on our Drawing 1 journey. This High Contrast drawing unit prepares them in layering pressure and blending techniques.
Practice Makes Permanent
Once they master the sphere (we finished in one and a half class periods (we are on a 90 min. block) they move on to the Origami Fox drawing – same size as the sphere – 5 x 5 inches – so they could practice the technique and work on scaling up the fox in the picture plane using a light contour line.
Let me digress for a minute and talk about paper size. Believe it or not, this matters, and this one component of any assignment can make or break its overall success.
If I give the kids an 18×24 piece of black paper and a white colored pencil and tell them to have at it the results will not be good. Let me backup…the results will not be good for most of the kids. You will always have a few who automatically get any concept you present and the paper size will not intimidate them. But we’re not focused on just a few. We are focused on success for ALL students.
Success. Not Perfection.
I work out. A lot. When I first started I was petrified. I was weak and I was pitiful. For real.
If someone had said at the beginning of my fitness journey, “Grab those 25 pound dumbbells and do 15 bicep curls” I would have grabbed my keys and tapped out.
It’s no different here.
The beginning exercises in any medium need to be achievable and designed for success for everyone in the room. A 6×9 inch piece of paper is not intimidating. A 5×5 inch picture plane is even less intimidating. The kids immediately see this as something they can conquer. Remember, they just finished the sphere in the graphite pencil unit two weeks ago. They know they can do this.
They also have the images of that cool student work fresh in their minds, knowing that all of those kids started right where they are now. With the sphere.
The Origami Fox Drawing
I do this huge project with my Drawing 2 class where the kids research and create origami creatures from scrapbook paper with designs on it (we build Fox’s Origami Animal Farm – everyone contributes 3 animals – it’s a hoot). During that venture a few years ago a student created this adorable little gray fox. It has become the icon for three different shading lessons in my shop.
Side Note: If you are printing the fox reference for kids to use in class, double check the exposure on your copier – you may need to lighten the doc a bit when you copy it, depending on the type of copier you have. For remote learning simply share the image on line with students. There is also an accompanying step by step fully narrated student tutorial.
This drawing also takes about 1.5 classes to complete, so Day 1-3 is spent on the sphere and the fox.
Here are a few of the Origami Foxes from this semester:


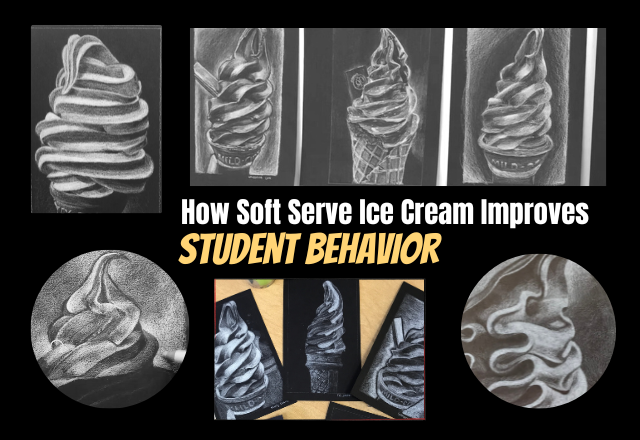
For Drawing 1’s final project, we do the soft serve Ice Cream Drawing, mostly because it’s so fun, but also because it really strengthens their knowledge of how to create smooth value transitions. And what a confidence booster!
The soft serve ice cream marries the knowledge mastered in previous lessons with this new colored pencil skill and reverse value info. I tell the kids we are continually filling our Drawing Tool Box and this is just one more tool (see previous blog post Drawing From the Tool Box). Each new skill builds on the skill before it.
Thank you for stopping by and listening to me wax on about scaffolded learning. I truly believe that everyone can be successful at Drawing and Painting using this tested and proven approach.
Check out Teaching Beginning Drawing – A Sequential Approach in my shop – it outlines the entire 18 week timeline with corresponding projects in further detail.
Not sure you’re interested in being on the list?
Check out my teaching style with a FREE Mini-Workshop!
Each one comes complete with classroom resources. Take all six!
Choose from these FREE workshop topics:
- Colored Pencil Basics
- Colored Pencil Skin Tones
- How to Draw the Human Eye
- Art Task Cards – Drawing on a Grid
- How to Draw Ice Cream (pictured below)
- Acrylic Painting Basics
Have a wonderful and safe year and Happy Teaching!
Tiff 🙂

behavior soft
behavior analysts
applied behavior


Share This Post