


Learning to Draw With Negative Space is Key
Learning to draw with Negative Space is key to a strong foundational skill set for young artists. The Art Element Space – Negative Space – is so important when it comes to observational life drawing. We use Negative Space to see, discern and render objects. This space gives us the ability to assess relationships between objects in a composition, It also helps students draw them with accurate scale and proportion. This is the one time the word “negative” isn’t a bad thing.
This drawing skill is Tool #3 in the Drawing Tool Box – Skills #1 and #2 are Line Drawing and Drawing with Shapes. Each drawing technique builds upon the one before it. This scaffolded approach allows students to learn a particular drawing skill and “get good” at it before they move on to the next skill. This slow approach builds confidence in students, which in turn prevents disciplinary issues. Kids who are invested in the classroom environment do not destroy the environment – or anything in it.
At this point in the semester we have established a strong art room community. We have a common goal – To Always Be Fabulous – and a mission for excellence. Every time students enter the room they know what to expect and what is expected. It is a safe environment because there are no surprises. The atmosphere breathes consistency.
We are about to add a tool to the Drawing Tool Box. It’s one that is absolutely crucial to growing the artist’s eye. Negative Space. I just introduced this concept to Drawing 1 yesterday. I began with the same mantra as usual, “We need this skill for the end game.” That game is observational life drawing.
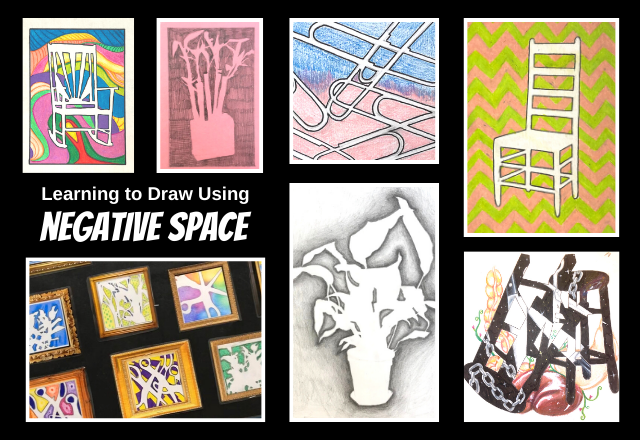
I am constantly re-visiting the “end game”. Students need to understand “why” they are learning something. In this case, it helps them to see previous students’ negative space drawings. Not work from the internet, but work created by former peers – work from the same lesson these students are about to tackle. This makes the task relatable and doable.
We talk about how valuable negative space is when deciphering correct proportions in a life drawing situation – the edge of a cascading fabric composition, the inside of a multi-object still life, the gesture of a seated figure, and so on.
Trusting the Process
We also discuss mastering proportion when using a 2-dimensional reference. With the constant mindset of scaffolding knowledge as our “mission” to mastery, students begin to expect that what they are about to learn matters. It’s purposeful. No matter what the exercise is. My students don’t mind worksheets, they don’t mind cartoons, they don’t mind painting boxes covered in paper. No matter how outwardly mundane an assignment may appear, the students are confident that it serves a greater purpose. They trust me and they trust the process. And as a result, they give their best to the task.
Once they are confident that the learning serves a purpose, the buy-in to try and do well is automatic. I never hear the question, “why are we doing this?” or “why do we have to do this?” because I cover the purpose in the first five minutes when introducing any concept. Then as we talk about purposeful learning and I refer to the past student works, the reaction is “hmmm, well if they can do it then I guess I can too.”
The added bonus is this – as the semester moves forward I no longer have to state the goal. When I introduce a new skill or concept, the expectation is that we need this skill to move to the next level. The scaffolding is consistent. The knowledge builds. The skills grow. Confidence soars.
When it’s time for the next skill, because the consistent pattern is in place (see previous blog post on lesson layout) the kids know what to expect. No surprises. No busy work. A consistent pattern of scaffolded learning.
It is so refreshing to have a calm positive atmosphere in which to engage students. While this does not happen overnight, if you begin to build it and stay consistent, you will walk into a room each day where students are ready to tackle whatever you set before them. They are confident in you, the goal and the process. (Complete classroom management resource)
Ok, back to Negative Space. The space between.
The Negative Space Scaffold
The Stool Drawing
1. The Stool Drawing (1 day) – Following a short presentation with notes, for in person instruction I demo the stool drawing on the overhead projector (for you youngin’s this is an invaluable teaching method when the internet is down). During virtual learning I created a stool drawing video tutorial. We are hybrid now (and social distancing is a real thing) so I actually showed the video in class and talked them through it.


***All three teaching methods are ALWAYS successful. In a class of about 30 students, EVERYONE gets it. All the time. Seriously. (I think there is a post on our classroom IG somewhere that pans all of the worksheets hanging on the wall.)
Negative Space Scissors or Paper Clips Exercise
2. Negative Space Scissors or Paper Clips exercise – overhead projector, via video tutorial, or via guided video tutorial in class. Again, everyone gets the concept and they all bring their own creativity to the assignment. I present worksheets as a Mini Masterpiece with a message. The viewer receives a message about the artist and the level of commitment that created it. Hard work speaks for itself. And last but not least, excellent craftsmanship covers a multitude of sins. (Scissors exercise & Paperclips exercise)


*Flashback: The expectation set at the start of the semester is one of excellence in all areas – I know this sounds crazy but I rarely get sloppy or unfinished work. From anybody. I asked my class one day why they think all the work is so neat and well done and they said, “because that’s what we do in here.” They looked at me like I was nuts for even asking….lol
Negative Space Chair Project
3. Negative Space Chair Project – This is our foray into working a little larger and getting super creative with the Negative Space. By now they are totally comfortable with the skill, so they dive right in. My deal-breakers are they must draw using ONLY negative space, they must scale up to almost fill the picture plane (5×7 inches) and they must use excellent craftsmanship. (flashback to the attitude of excellence).


***Virtual Learning Hack – we do this chair project on mat/illustration board to avoid the dreaded tracing…contact your local frame shop for scrap mat board – they are constantly throwing it out and would love to donate to your program! I cut the pieces and leave them in a bin out in front of the school for pick up.
Observational Still Life
4. Observational Still Life – this is the first time in Beginner Drawing that we draw from life. I set up objects with the level of difficulty matching the skill set of the class. And then I bump it up one notch higher. Most of the time it’s 2-3 stools in various positions, sometimes there’s a ladder or a chair thrown in for good measure…or a crutch…or a lamp. Or all of the above.


***I do a lengthy demo on how to sit, how to use your drawing board (another great hack – ½ foam core cut to 18×24 inches makes a fabulous light-weight drawing board we use bulldog clips to hold the paper), how to keep your head still and your gaze constant, etc. We discuss how important that first shape is in getting the scale correct so everything fits on the paper (Shape Lesson). They stand behind me so they can see the board and the still life. Now that we are hybrid I plan to shoot a “Life Drawing” tutorial (not completed yet – stay tuned)
Remember, the overall mindset of the previous drawing lessons (Quadrant Method, Shape Method) has been that we are preparing for Life Drawing. As I pointed out before, we have been preparing for this for the last 4-6 weeks. So now when they walk in and the still life is set up, no matter how intricate it is they are not the least bit intimidated. No pushback, no “oh man, I can’t do this”, no negativity at all. They are confident because our approach to learning is consistent.
Side Note:
Set up the still life before the class begins. When they walk in, it’s ready to go. Supplies – Foam Boards, paper, clips and pencils are ready to go (I set it all up on my back counter). The kids come in, I do the lengthy demo, and they roll with it. The less “down” time – finding supplies, trying to let everyone have input on the still life set up, etc. the better.
The entire Negative Space Unity usually takes about 3 weeks, give or take a day. Next to teaching Value, I spend the most amount of time on Negative Space. I realized about 5 years ago that the more time I spend on drawing fundamentals dealing with Space, the better the kids’ work becomes.
Thank you so much for taking time to read this and for stopping by my website. If you have any questions or comments or if you are interested in joining my mailing list (cool stuff is coming soon!) stop by my home page and submit your email.
If you have done any of these lessons with your students I would love to hear how it went and see some fabulous work!
Please get in touch either on our Instagram @mrs_tfox or via Facebook at Fox’s Fabulous Artists or comment below 🙂
Have a wonderful day!
Tiffany
Here is a resource on negative space in art:
positive space, work of art, human figure, black and white, what is negative space in art, negative space art, negative space in art, positive and negative space drawing , vanishing point, positive and negative space, overall composition, optical illusions, white space, positioning negative, space is the space, negative space is the space, space in art, negative space to create areas of interest


Share This Post